Archive for July 2009
Great Site
I’m into computer security (among so many other things)…
While I was stumbling around the internet today and found this site:(www.rnicrosoft.net)
Nick has some amazing stuff here, and in my opnion his site is totally worth a read.
Tutorial: Protect Folders In Windows
Sometimes we have folders and files that we don’t want anyone to be able to read… banking information, taxes, porn, lots of things.
I was thinking of this, when I decided to peek around the web to find anything that may help; and although i forget the site, i DID find something quite handy. (http://www.bukisa.com/articles/108657_remove-stored-passwords-and-hide-floder-with-recycle-bin)
Basically, it turns any named folder into the “recycle bin” by using the CLSID of the recycle bin. Interesting Stuff!
Like normal, I created a batch script for those of you interested.(https://ejesconsulting.wordpress.com/scripts/hidefolder-bat/)
Cross Mobile Platform
My wife recently showed me this site that she goes to; Women’s Health. They have an “app” so to speek, it’s a nice little slide show, in mp4 format, easy to put on all your mobile devices. I think that this is a GREAT idea because it has such cross platform potential. It’s cheap, easy and best of all supported by all the major moble operating systems.
Tutorial: Bittorrents in FreeNAS
As you might notice, I have been playing around with FreeNAS a lot lately.
Among the many features that I enjoy in the FreeNAS project, one of my very favorite ones is the Bittorrent Server that it has built in.
Really it’s just a verion of Transmission bittorrent web client which I remember from Mac OS. (http://www.transmissionbt.com/) but running in WebGUI mode (by default on your freeNAS server on port 9091 http://freenas:9091 or similar)
The features that I want specifically is the blocklist feature, which allows you to download a list of blocked ips from known malware locations or otherwise malicious sites, and the ability to encrypt my traffic so that my ISP cannot detect my bittorrent traffic.
So let’s get started:
Step 1: Let’s open our firewall to let incomming bittorrent connections through. This will help the speed of my bittorrent client dramatically. In order to trick my ISP from throttling my connections, I’ll be trying to get bittorrent to look like a VPN. This is accomplished by allowing only encrypted peers and setting the bittorrent traffic to well known VPN TCP port 1723. On the firewall I only need to forward the VPN traffic port TCP/1723 on all WAN connections to my FreeNAS server on the same port.
Step 2: Under System| Advanced | rc.conf tab in the FreeNAS webGUI; add two variables: transmission_blocklist=YES, and transmission_noblocklist=NO.
Step 3: Under Services | Bittorret; set the incomming port the 1723 (the VPN port I set earlier on my firewall), Disable UPNP, and enable Encryption. Then Save and Restart the service.
Step 4: Download the blocklistdl script from my script repo (https://ejesconsulting.wordpress.com/blocklistdl/). Its actually the same as the script from (http://sourceforge.net/apps/phpbb/freenas/viewtopic.php?f=60&t=519&start=40). Place the script in a conveniant directory. I put mine in my transmission home directory in a subdirectory called “bin”. I changed the attributes to executable, and owned by “transmission:staff”; the user and group that bittorrent runs as.
Step 5: Add a cron job to the System | Advanced | Cron tab of the FreeNAS Web Gui to run the script at a predetermined time. I set min to run every Sunday night at midnight.
Step 6: While in the cron tab, I added a few timed download limits so that while I’m asleep or not home the bittorrent client can take 100% of the network bandwith, but while I’m expected to be at home it would reduce it’s available downloads to a fraction of my maximum bandwitdth.
The command is “/usr/local/bin/transmission-remote –no-uplimit –no-downlimit –auth admin:xxxxxxxx” to unlimit and “/usr/local/bin/transmission-remote –uplimit 20 –downlimit 20 –auth admin:xxxxxxxx” to limit to 20Kbps and 20Kbps upload and download while I’m home – please modify these parameters as you see fit.
![]()
![]()


As always, if you find this useful or need more info I’d be happy to help.
Updated Screenshots for MediaWiki Tutorial

-

- FreeNAS WebGUI Configuration Settings


Tutorial: Install MediaWiki on FreeNAS

- FreeNAS Services|Webserver configuration
This is a step by step tutorial on how to go from “spare computer” to NAS w/MediaWiki for home.
Let’s get all our prerequisites together first: A copy of freeNAS (www.freenas.org), a burnable CDROM, and a burner.
Burn FreeNAS onto your cdrom, and boot FreeNAS from the CDROM.
FreeNAS is quite easy to configure and setup – so I won’t cover it here.
Once you have a running FreeNAS setup, you must enable the webserver.
For simplicity, I changed my managment inteface to run on https (port 443), and my wiki page is the default http (port 80). To do this you can easily go to “System -> General” on the FreeNAS gui, then under WebGUI change the “Protocol” to HTTPS and the Port to 443.
Enable webserver under “Services -> Webserver” and put it’s “Document root” somewhere useful. I put mine on my default public drive.

- Configuration settings for your WebGUI
Now I need a user to login to FreeNAS on the command prompt. My default user can do this by setting the “Shell access” in the “Access -> Users -> Edit” menus.
Also note that I am part of the “Admin” group, which allows me to run “su” to become root.

SSH to FreeNAS and become root
Now, open up an SSH session to the FreeNAS server and become root. Your root password is the same one for the “admin” GUI.
Go to http://www.mediawiki.org and download the latest version of MediaWiki. I did it with “fetch” on my command prompt.

using fetch, I downloaded mediawiki
Then decompress it: (tar -vxzf mediawiki-1.15.0.tar.gz &&mv mediawiki-1.15.0/* . && rm -rf mediawiki-1.15.0)

Do what it says, configure it.
Then browse to your mediawiki page (it would be the root address of your NAS server).

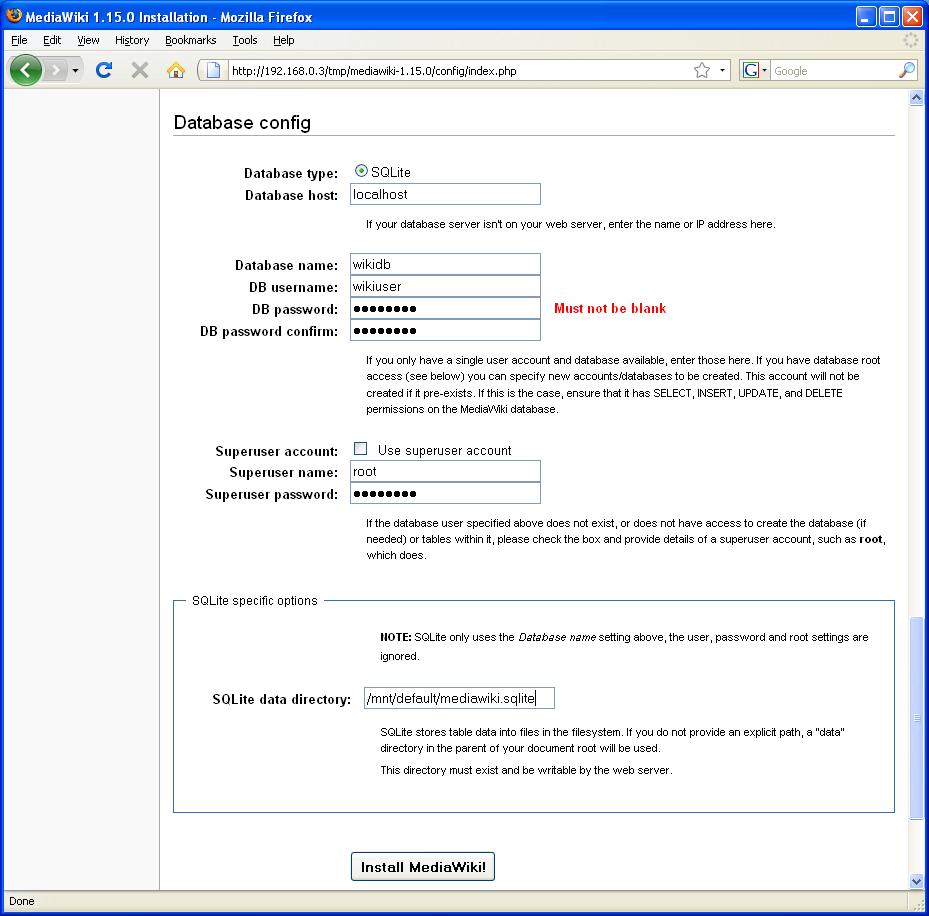
MediaWikis database.
Fill out the questions that MediaWiki asks; but in “database config” you must configure a database and add a db to the “SQLite data directory”. I used a directory that cannot be browsed to on the web.
Then you should get a screen telling you that the installation was sucessful; next you move the “config/LocalSettings.php” file to the web-root. and change ownership of all the

Move the config, finalise the wiki
web files. (mv config/LocalSettings.php . && chown -R www *)
Now that that’s all configured, you can remove you “config” directory (if you’re making it external. )

